Adding and Applying CSS to HTML
There are three main ways to apply CSS to an HTML document.
1. External CSS Stylesheet
External styles are defined within the <link> element, which is used to link external resource to the current HTML document. It is defined inside the <head> section of the HTML page:
Conditionally Loading External CSS Stylesheet
We can also conditionally load an external stylesheet with media queries. This works by setting a media type in the media attribute.
In the following example, the CSS stylesheet print.css file will only be loaded if the media condition is true, which is a printer (e.g for print preview and printing).
index.html
<!DOCTYPE html>
<html>
  <head>
    <link rel="stylesheet" href="main.css">
    <link rel="stylesheet" href="print.css" media="print">
  </head>
    <body>
        <h1>Title...</h1>
        <p>Content...</p>
         <footer>
           <p>Khalid Alharbi</p>
           <p><a href="mailto:someemail@cpit405somedomain">Email</a></p>
         </footer>
    </body>
</html>
print.css
/* This hides the footer element when printing the webpage */
footer{
  visibility: hidden;
}
2. Internal CSS Stylesheet
Internal styles are defined within the <style> element, which is defined inside the <head> section of the HTML page:
3. Inline styles
An inline style is defined within a single HTML element.
4. Browser Default Style
The web browser may have a default style to be applied when rendering an HTML page.
Cascading Order in CSS
When there is more than one style defined in an HTML document, the style will be often applied as follows:
- Inline style will take a higher priority.
- External and internal style sheets will be applied depending on which one is defined last in the head section.
- Browser default style.
For more information, refer to the MDN’s article How CSS is structured.
CSS Selectors
1. Universal Selector
The CSS universal selector * matches all HTML elements in the document.
2. Element selector
3. Id Selector
4. Class Selector
5. Combinator selectors
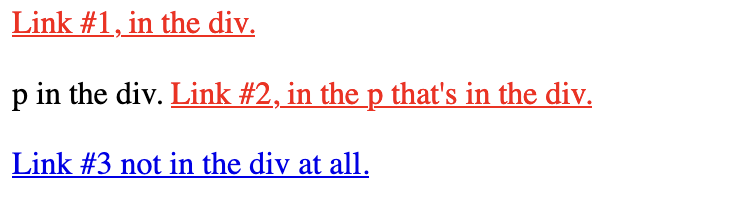
5.1 Descendant combinator (selector1 selector2)
Syntax: element1 element2
Matches the descendant element(s) of the first element.
<div>
  <a href="#">Link #1, in the div.</a>
  <p>p in the div.
    <a href="#">Link #2, in the p that's in the div.</a>
  </p>
</div>
<a href="#">Link #3 not in the div at all.</a>
div a{
  color:red;
}
Result:
Try it:
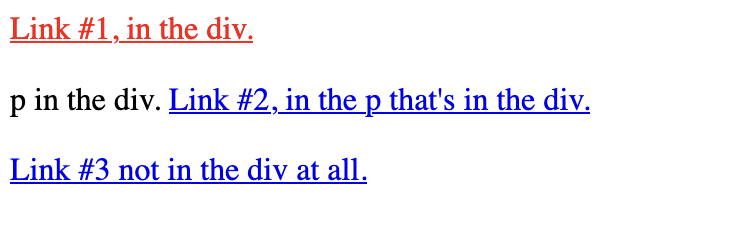
5.2 Child combinator (selector1 > selector2)
Syntax: element1 > element2
Matches the direct child or children of the first element.
<div>
  <a href="#">Link #1, in the div.</a>
  <p>p in the div.
    <a href="#">Link #2, in the p that's in the div.</a>
  </p>
</div>
<a href="#">Link #3 not in the div at all.</a>
div > a{
  color:red;
}
Result:
Try it:
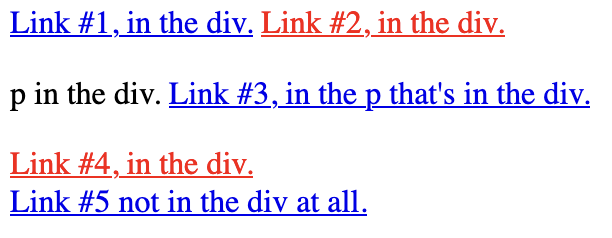
5.3 General sibling combinator (selector1 ~ selector2)
Syntax: element1 ~ element2
Matches all sibilings of the first element that are following the first element but not necessarily immediately.
<div>
  <a href="#">Link #1, in the div.</a>
  <a href="#">Link #2, in the div.</a>
  <p>p in the div.
    <a href="#">Link #3, in the p that's in the div.</a>
  </p>
  <a href="#">Link #4, in the div.</a>
</div>
<a href="#">Link #5 not in the div at all.</a>
a ~ a{
  color:red;
}
Result:
Try it:
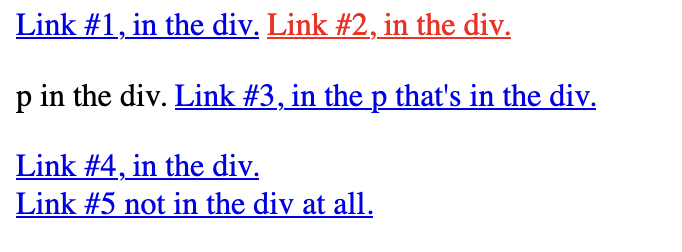
5.4 Adjacent sibling combinator (selector1 + selector2)
Syntax: element1 + element2
Matches the immediate sibiling of the first element that is immediately following the first element.
<div>
  <a href="#">Link #1, in the div.</a>
  <a href="#">Link #2, in the div.</a>
  <p>p in the div.
    <a href="#">Link #3, in the p that's in the div.</a>
  </p>
  <a href="#">Link #4, in the div.</a>
</div>
<a href="#">Link #5 not in the div at all.</a>
a + a{
  color:red;
}
Result:
Try it:
CSS Pseudo-classes
Syntax:
selector:pseudo-class { property: value; }
In CSS, a pseudo-class is a keyword added to a selector to indicate a special state of the element (e.g. when the mouse cursor is over the element or the element was clicked on).
There are several CSS pseudo-classes ↗. Below are some of the most commonly used pseudo-classes:
:visited
- Matches links that have been visited.
:hover
- Matches when the mouse pointer is over an element.
:required
- Matches when a form element is required.
:optional
- Matches when a form element is optional.
:first-child- Matches an element that is the first of its siblings.
:last-child
- Matches an element that is the last of its siblings.
:nth-child()
- Matches elements based on their position among a group of siblings.
Example:
index.html
<ul>
  <li><a href="#">First</a></li>
  <li><a href="#">Second</a></li>
  <li><a href="#">Third</a></li>
</ul>
style.css
li{
  display: inline;
  margin: 2%;
  padding: 0.5em;
}
a:visited {
  color: blue;
}

li:first-child {
  background-color: yellow;
}

li:nth-child(2) {
  background-color: red;
}

li:last-child {
  float: right;
  background-color: grey;
}
Try it:
CSS Pseudo-elements
In CSS, pseudo-elements are keywords added to element(s) to style a specific part of the element(s). Below are examples of psudeno-elements:
::first-line- This can be used to apply styles to the first line of a block-level element. For example, change the font of the first line of a paragraph. The length of the first line is determined by many factors, including the width of the element, the width of the document or screen and the font size of the text".
::after- This can be used to add a psudeo-element that is the last child of the selected element. for example, new content to the end of an element.
::before- This can be used to add a psudeo-element that is the first child of the selected element. For example, new content to the beginning of an element.
::selection- This can be used to style an element that has been highlighted by the user (e.g., mouse clicking and dragging the mouse across text).
Example: The example below shows how to change the font style of the first line and add a wide-Headed north east arrow ↗ after an external link.
<p>This is the first line. Welcome to CPIT-405! This is a link to the <a href="https://cpit405.gitlab.io">course
    website</a>
  This is a link to an
  <a class="external" href="https://developer.mozilla.org/en-US/"> external website</a>, the MDN Web Docs.
</p>
p::first-line {
  font-weight: bold;
}
/* Add a North East Arrow for extneral links*/
a.external::after {
  content: " ↗";
}
Result:

Try it:
For the complete list and description of CSS pseudo-elements, see MDN - Pseudo-elements
Example: Navigation Bar
Below is the HTML and CSS code for creating a horizontal navgiation bar that looks like this:

index.html
    <ul>
        <li><a href="#home">Home</a></li>
        <li><a href="#products">Products</a></li>
        <li><a href="#blog">Blog</a></li>
        <li><a href="#contact">Contact us</a></li>
        <li><a href="#login">Login</a></li>
    </ul>
style.css
ul{
    background-color: #eee;
    padding: 0px;
    height: 40px;
}
ul li{
    list-style-type: none;
    float: left;
    margin-right: 30px;
}
ul li:last-child{
    float: right;
    margin-right: 0px;
}

ul li a{
    padding: 10px;
    text-decoration: none;
    display: block;
    width: 130px;
    text-align: center;
    font-weight: bold;
    text-transform: uppercase;
}
ul li a:hover{
    background-color: #7e7e7e;
}
Try it: